After checking the real world route of Canadian North flight 439, we will now prepare the full flight plan for our trip from Yellowknife (CYZF) to Edmonton (CYEG).
About PFPX
For doing my flight planning I use the payware tool PFPX. It uses a pre-defined performance profile for the aircraft, lets you set up certain parameters (origin, destination, payload etc.) and calculates the optimal route, vertical flight profile and fuel load. For determining the route it uses a built-in navigation database that can be updated using AIRACs provided by subscription services like Navigraph’s FMS Data or Aerosoft’s NavDataPro. Also it takes current weather information into considerations it obtains from an online service (also subscription-based).
Using PFPX for Flight Planning
Before you get started with PFPX you need to set up the aircraft you intend to use, fortunately enough there already is a configuration for a Boeing 737-200. Since PFPX seems to be mostly used on the MSFS/Prepar3d side of things, it was not specifically made for the FlyJSim 737-200. But it seems to be good enough to be used for it, I have not had any issues so far.
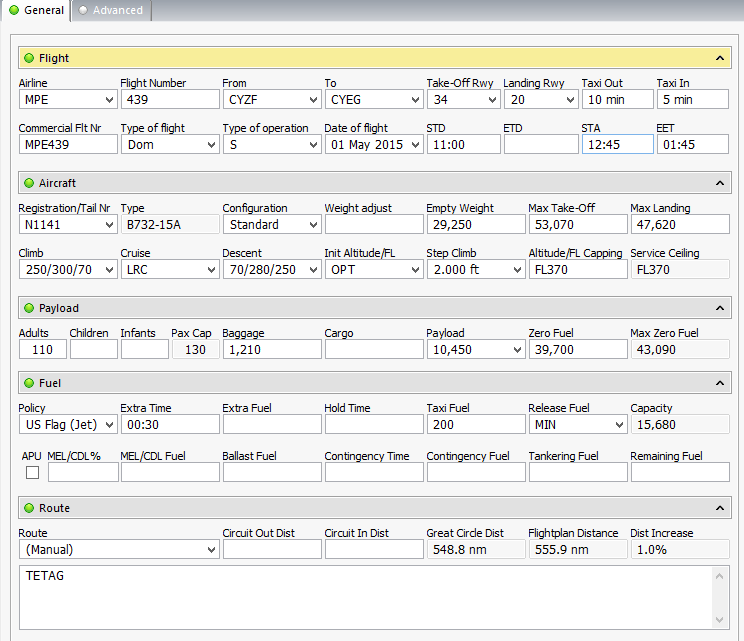
When you create your flight you will be presented with a form to set everything up:

You will need to make a few selections: Airlines, Flight Numbers etc. are purely informational and unless you use it in the context of a virtual airline there is no point in filling them out, really. You can just leave them empty. The only thing that needs to be entered in the first section, is the origin and the destination, runways are then automatically selected based on the current weather situation at the selected airports.
As aircraft you have to select the one you previously set up, of course. Depending on the aircraft configuration you might also be able to select between several cruise speed profiles depending on whether you want to save any virtual fuel.
The payload you can freely select and do not spend too much time interpreting the actual values there, I tend to put some arbitrary value into the Pax fields, FlyJSim’s default weight for a passenger differs a lot from what PFPX uses by default. That could probably be adjusted, but I never bothered to do so. The important part here is really just the total payload value in a way that it does not end up suceeding the maximum take-off weight (MTOW) for your aircraft (PFPX will complain about it in case it happens).
For the fuel load I chose US Flag (Jet) regulations since PFPX does not come with a set of regulations for domestic canadian flights, but it could probably be found somewhere/easily created yourself, in case you need that level on realism. In this case I also abitrarily selected 30 minutes of extra time for my flight.
As route for the flight I manually selected the real one I described in my last post. It is rather simplistic, After my departure, which will just be one basic turn to the route (no elevation to speak of around Yellowknife), I will proceed direct to the TETAG waypoint, which will be the entry to the TETAG1 STAR (Standard Terminal Arrival Route). The chart to that STAR will later tell us how we get from that waypoint to the threshold of runway 20.
Alternatively you can also click on “find” in the route dialog so that it automatically finds a feasible route for your flight. Usually I would do exactly that, but as explained in the previous post, in this case the route was less than optimal.
There is also additional fields in the form for alternates and ETOPS operations, but I will skip explaining these for now.
The Final Flight Plan
After all that we can click on “Compute Flight”, it will then calculate everything needed for the final flightplan. If you are happy with what you see, you can click “Release Flight” to finalize it. You are then able to print it out for the use during the flight.

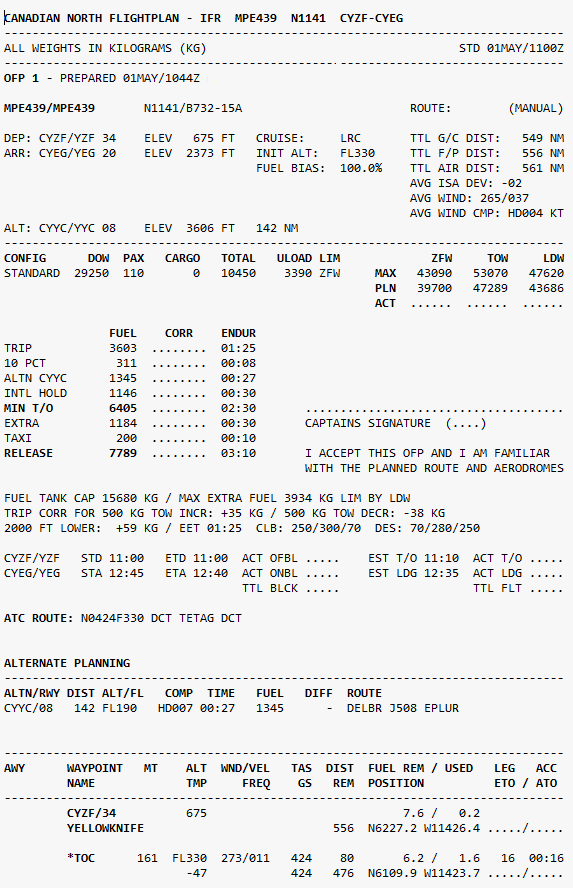
Figure 2 shows the first page of our generated flight plan. You see the runways as you already saw in the form in Figure 1, but it also contains the field elevations, which is useful for setting up the pressurization system of the aircraft. PFPX after taking the aircraft performance, payload, route and current winds into consideration determined our optimal cruise altitude to be flight level 330.
You see detailed information on the weights after the first horizontal line, this can later be used to set up the weights inside the simulator.
On the left after that you see a detailed listing on the fuel we will take with us, since I did not select the real world regulations for the calculations and also put 30 minutes extra in for a 1.5 hour flight, we actually will carry more than twice than what the minimum is for the trip.
After a few more informations about the weights, climb and descent speeds as well as some schedule informations, the plan shows the route as would be published to ATC. It is still the direct leg to TETAG, as to be expected.
After the alternate planning, which I will skip for now you see the first section of the route up to the Top of Climb (TOC). In this table you will find time estimates, fuel estimates, distances, in case of VORs or NDBs frequencies and a lot more. The most interesting information for us is the “POSITION” field, which contains the co-ordinates of the waypoints on the route. We will need those later on to enter the flight plan into the INS. It does not feature a navigation database, so we have to enter the waypoints manually.
When I take a longer route in an aircraft with a x-plane standard flight plan compatible FMC or the built-in GPS, I use the PFPX export facility to directly export a compatible flight plan. If I remember correctly the CIVA INS also supports loading flight plans like that, but usually don’t take the 737-200 or the 727adv for longer flights and thus don’t mind entering a few waypoints manually.
After all this is done, we are ready to fire up X-Plane and get flying. In the next post I will discuss where I get the navigation charts for the flight how I select which ones to use.