Finally, after four blog posts of preparation, everything is ready and we can launch X-Plane. Keep in mind that everything I described in the previous posts usually only takes a few (speak single digits) minutes.
INS Alignment
As mentioned in the first post of this series I will use the FlyJSim 737-200 with Philipp Muenzel’s CIVA INS. The INS needs quite some time to warm up and properly align itself. So the first thing I do inside the plane after establishing electrical power is taking care of the INS alignment.
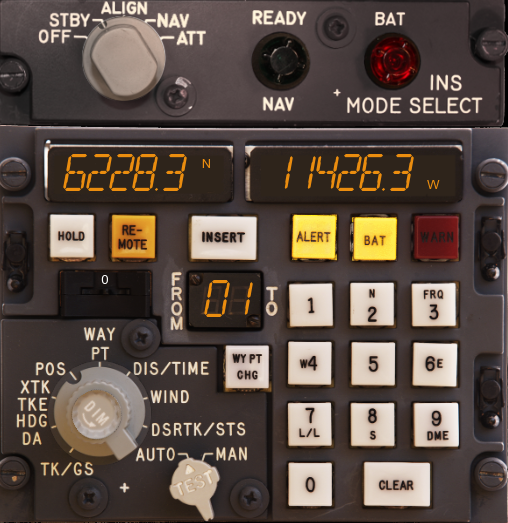
Figure 1 shows the INS after entering the initial position. I took the position from the Aerodrome Chart as described in the last post. After this the alignment process can be started by moving the mode selector to “ALIGN”.

The progress of the alignment can be monitored by moving the data selector to “DSRTK/STS”. The digit showing “9” in Figure 2 will continuously count down as the precision increases, the optimal performance being at “0”. During flight the value slowly start increasing over time unless you do a DME update to re-align it.
Entering Waypoints
For now I just enter the waypoint leading into the STAR, TETAG, as described in the previous posts. This is done by rotating the data selector to “WAYPT” and the little thumb wheel above it to “1” for the first waypoint.
Take-Off Speed and Flaps Settings
The 737-200, being a pretty old lady by now, does not feature an auto-throttle. This means you need to manually set your thrust for each phase of flight. For a higher level of realism this should also mean having to calculate the appropriate thrust-, V-speed- and flaps-setting ahead of time. There already tools to do this ahead-of-time, for instance FlightSimSoft’s TOPCAT. Unfortunately there is no 737-200 built into it, neither could I find one online. If it were, it would automatically calculate the above values depending on the weather situation and gross weight of the aircraft.
Since this is not the case, currently some guess work is involved in getting the FlyJSim 737-200 off the ground. Fortunately it has a little built-in tool simply called “Vcard”. You still have to manually select your flaps setting (the tool does not now anything about the runway), but it at least calculates V1, V2, VR and the Flaps retraction speeds for you.
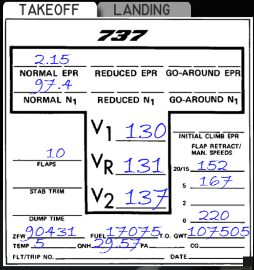
Figure 3 shows the calculated speeds for the flight to Edmonton. I arbitrarily selected flaps 10 (by clicking the number written in the “FLAPS” field).
After the INS is aligned, we move the mode selector from “ALIGN” to “NAV” to put it into navigation mode. Do not ever forget to do this before releasing the park brake, it is a major annoyment. ;-)
Now we are finally ready for our departure out of Yellowknife Airport. In the next post I will show the take-off, climb and cruise of the flight.